

Olá :) Tudo bem com vocês? Hoje volto a postar tutoriais e várias dicas fofas aqui para o blog! Aprendi muitas técnicas novas durante esse ano e estou animadíssima para ensinar à vocês! Vale lembrar que essas peças podem virar acessórios para looks hime, lolita, larme entre outros.
A técnica de hoje se chama Skinner Blending, que nada mais é do que a mistura de duas ou mais cores de biscuit para desenvolver faixar degradê/ ombrê! O efeito é maravilhoso e apesar de parecer difícil é super fácil de fazer! Junto com a técnica, vocês também irão aprender a fazer uma água viva fofosa *3*
Hello :) How are you doing? Today I'm back to post tutorials and tons of cute tips for the blog! I've learnt a lot of new techniques this year so I'm really excited to teach you guys some cool stuff! It's important to know that these pieces can become hime gyaru, lolita or larme kei acessories and so on!
Today's technique is called Skinner Blending, which is a very known polymer clay technique in which you mix two or more colors of clay together in order to create ombree/ gradient strips! It's super easy to do and the final result is amazing! Also, today I'm going to teach you how to make a super cute jellyfish using this blending technique *3*
MATERIAIS/ WHAT DO YOU NEED

* Rolo de plástico/ Plastic Rolling Pin
* Ferramentas para esculpir biscuit e cortador de massa/ Sculpey tools including a plastic knife
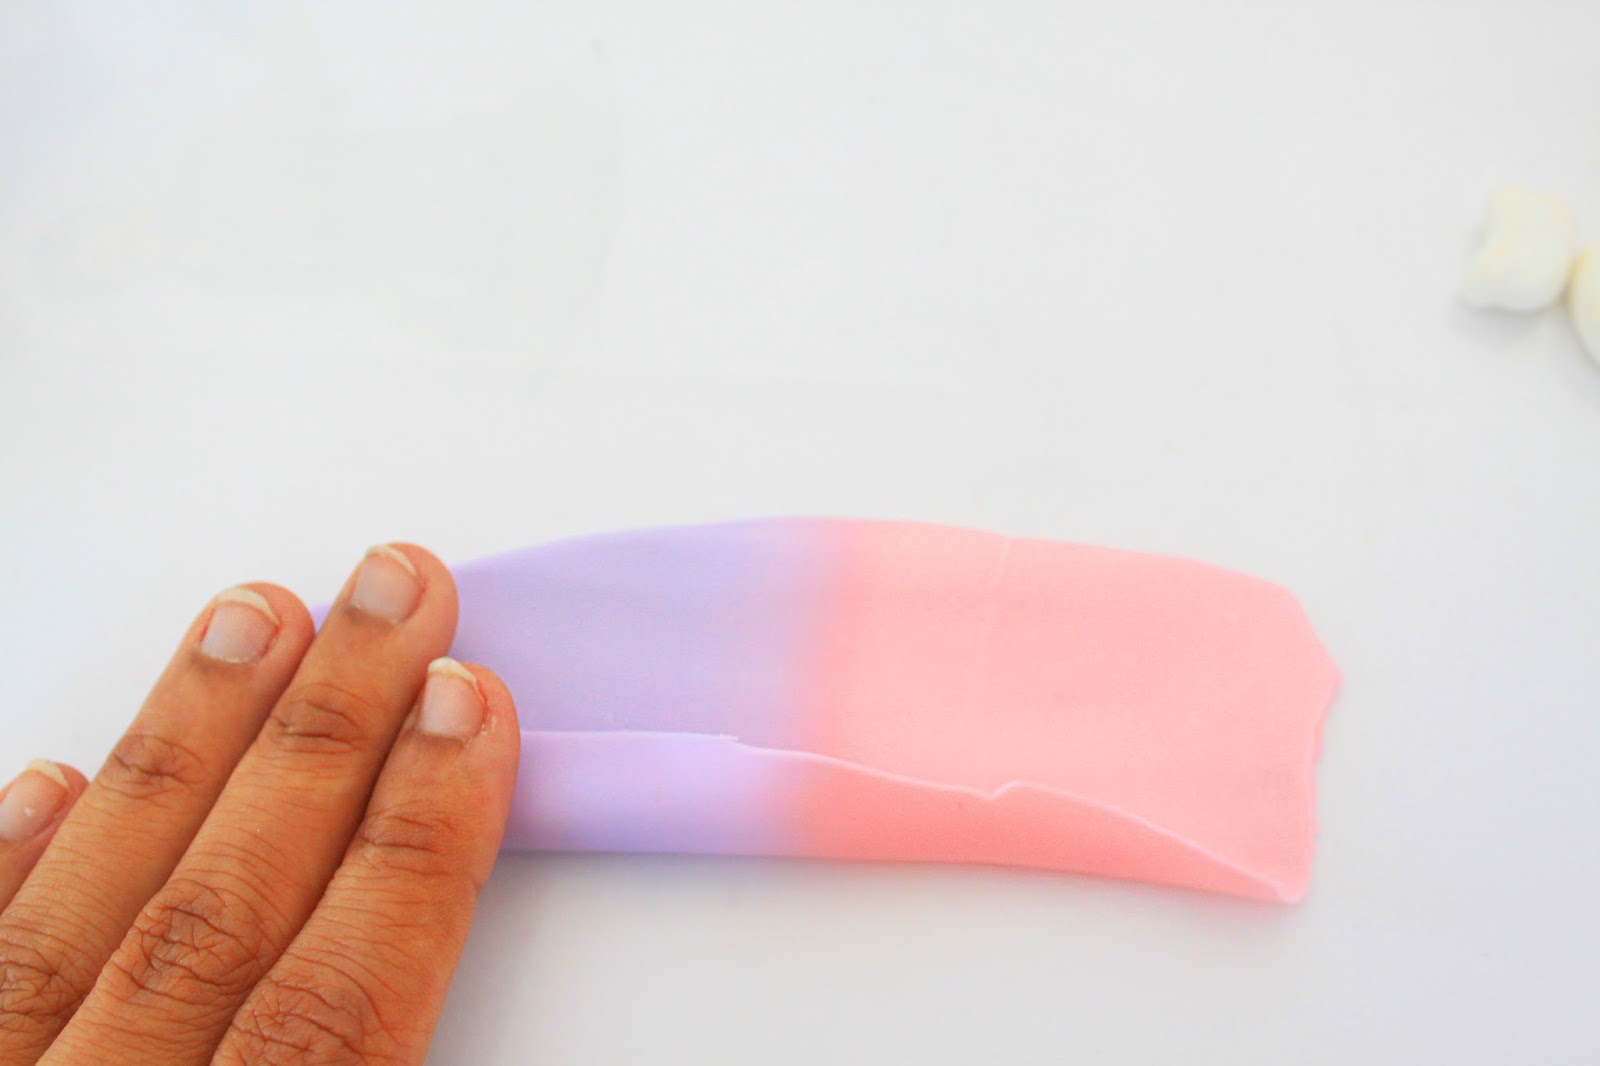
* 2 massas de Biscuit (rosa chá e lilás)/ 2 polymer clay bags (pink and lilac)
Geralmente se usa uma máquina de fazer macarrão para fazer isso rapidamente, mas vou ensinar o método mais fácil que se chama Teardrop Method, ou como prefiro chamar, método coxinha haha
Usually people use a pasta machine to do it quickly, however, I'm going to use an easier method, which is called Teardrop Method.
PASSO A PASSO/ STEP BY STEP
#1 Faça duas gotas longas de biscuit/Make two teardrops with the clay

#2 Junte as duas gotas em sentidos opostos/ Match the clay pieces together, but on opposite sides

#3 Amasse as duas gotas com as mãos/ Mould the two teardrops down with your hands

#4 Use o rolo para amassar as massas/ Use the rolling pin to mould the clay

#5 Continue a rolar a massa até ela ficar bem fina/ Keep rolling the pin until the clay becomes thin

#6 Quando a massa estiver fina, vire-a e dobre na metade/ When the clay is thin, turn it up and fold it in half

#7 A massa deve ser dobrada assim/ Make sure to fold the clay like this

#8 Ela deve estar dobrada assim, Você vai precisar repetir esse processo toda vez que rolar a massa dobrada/ The clay must be folded like this. You'll need to repeat this fold every time after you roll.

#9 Volte a amassar o biscuit com o rolo rapidamente. Repita o processo #8 quantas vezes quiser, até sentir que as massas estão se misturando/ Go back to rolling the clay with the rolling pin. Repeat the process #8 as many times as you want, until you see the colors actually getting mixed together.

#10 Repita o processo de dobrar e rolar a massa 20 vezes para chegar nesse resultado de cores! A massa degradê está pronta :) / It took me 20 times repeating this process of folding and rolling until I finally got satisfied with the colors! The ombree clay is finally ready :)

Tutorial da água viva / Jellyfish Tutorial

#1 Pegue a massa degradê e faça um rolo com ela/ Take your finished ombree clay and make a roll with it
#2 Role a massa até ela ficar cilíndrica/ Roll the clay until it becomes cylindrical

#3 Para retirar a dobra da junção de massa, molhe um pincel com água e passe no cilíndro/ To eliminate the joining fold, take a paintbrush, put some water in it and then pass it by the clay shape.

#4 Use o rolo para amassar o cilindro degradê até ele ficar fino (não muito fino!)/ Roll the shape one time with the rolling pin until it's thin. (not too thin)

#5 Corte a massa em pequenos filetes e reserve-os/ Cut the clay into tiny strips and keep them stored.

#6 Faça uma bolinha com o biscuit rosa e use um 'boleador' para fazer um espaço dentro da massa. Essa vai ser a cabeça da nossa água viva :) / Make a medium bead of pink clay and use a double ended ball stylus to make space inside the bead. This is our jellyfish's head :)

#7 Aplique cola branca dentro da bolinha/ Apply glue inside the bead

#8 Pegue as tirinhas degradê e dê uma leve torcida nelas. Tenha cuidado para elas não se partirem!/ Take the ombree strips and gently twist them. Be careful to not break them apart!

#8 Use o cortador para diminuir os 'tentáculos' ao seu gosto/ Use the knife to cut the 'tentacles' on the size of your preference

#9 Cole os tentáculos dentro da cabeça e deixe a peça de cabeça para baixo por 5 minutos / Glue the tentacles inside the head and keep the piece upside down for 5 minutes

#10 Prontinho! Após os 5 minutos pode virar a peça e lembre-se de arrumar os tentáculos para ficarem bonitinhos! Não se esqueçam de colocar um alfinete enquanto a peça ainda estiver mole / All done! After 5 minutes, you may turn your piece and fix the tentacles so they look cute! Don't forget to add a pin while the piece is still soft/wet.

#11 Para sua água viva ficar ainda mais fofa, que tal adicionar olhinhos e uma boca com biscuit preto? Já para finalizar e proteger, passe uma camada de verniz geral sobre a peça, pois assim ela ganha um brilho molhado!/ To make your jellyfish look even cuter, how about adding some eyes and a little mouth made of black clay? Now, to finish and protect the work, make sure to apply a layer of craft's glaze to give the piece a wet gleam!

Por hoje é só! Espero que tenham gostado, nos vemos no próximo post :)
Kiss Kiss
That's all folks! I hope you guys liked the tutorial! Seeyou on the next post :)
Kiss Kiss


5 comments:
só vim ver as fotos e deixar um comment porque ele ficou muito lindo!!!
Estou vendo um anime chamado kuragehime que é a princesa agua-viva e a kurara (agua viva polvo) parece com essa que vc fez... <3
Q fofura, adorei *O*
http://dayanahargreaves.blogspot.com.br/
Oi moça....eu gostei tanto do seu tutorial q fiz uma pra mim, claro que não ficou igual kkkk
Amei sua água viva <3
Oi moça....eu gostei tanto do seu tutorial q fiz uma pra mim, claro que não ficou igual kkkk
Amei sua água viva <3
Omg this is too adorable! Thank you for sharing!
Kieli~♥
Postar um comentário
Nome:
Webpage:
Comment: